Learn
How to Roll the Perfect Joint: A Step by Step Guide
How to roll the perfect joint: A Step by Step Guide
Joints are without a doubt the most popular method of consuming marijuana, and the most flavorsome way to enjoy your bud.
It is the goal of every novice smoker to learn how to roll, and yet there is much debate surrounding the best way to do it. No matter which technique you choose, the main point is to make sure your joint works, and looks legit.

How much Weed Should I Put in My Joint?
It’s a good idea for novice-rollers to begin with just half a gram of cannabis, to fit either the traditional or 1 ¼ rolling papers. By the way, the pre-rolled joints that you can buy instore are usually 1 gram (although some stores offer twin packs of 2 half grams).
Half a gram is the perfect amount of weed for 2 people, and when you start small, it is easier to learn how to roll. After you have mastered the art of joint-making with small papers, you can level up to King sized papers or 1 gram joints for a whole group of friends.
How to Roll a Joint (Step by Step Guide)
This seven step guide will teach you everything you need to know about the subtle art of joint rolling. Even as a novice you will be able to learn how to roll, and we will teach you to do this with or without a filter.
But before we begin, you will need a few supplies:
- Marijuana
- Rolling Paper
- Backing Cardboard for the Filter
- A Weed Grinder (or Scissors)
- A Key, or a Small-Pointy- Object to Pack the Joint (Optional)
Step 1: Clip or Grind the Weed
First thing is first, if you have a large bud you will need to break it into smaller pieces with your fingers. If the weed is super dry it will be easier than if it is a sticky piece of Kush. Grinders are great because they are specifically designed to break down the weed, but you can also chop your weed using the tried-and-tested scissor technique. It is even possible to break your weed down into smaller pieces by hand (although not recommended). Grinders and scissors allow you to keep the crystals which are full of THC!
Step 2: Make Your Backing (Filter)
A backing goes by many names, and is also known as a garick, crutch or filter. You can make a backing out of anything “cardboardy”, but look for the consistency of cigarette box. Business cards are another great option, and some rolling papers even come with backing material too.
To make the garick, begin by cutting it to size (about 1 inch by half an inch) and folding it towards itself at the tip. Continue to “fold-roll” all the way along until the cardboard becomes soft and malleable. As you practice you will become skilled at assessing the size of backing needed for the size of joint desired. The purpose of the filter it to hold the joint together, and to make for a smoother smoke. It also allows the smoker to grip the joint without any weed falling out (or burnt fingertips).
Step 3: Fill Rolling Paper with Weed
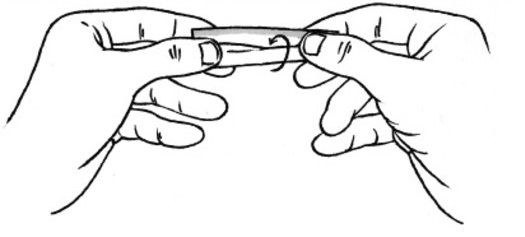
Step 4: Roll the Weed Between Your Fingertips
After you have successfully loaded up a nice joint, you can pick it up and roll it slightly between your fingers. Grip it firmly and roll it back and forth until the weed is compressed into a cone-like shape.
Step 5: Twist, Lick and Seal
It might sound super easy, but the way you twist your joint is the secret to success. What you need to do to nail this step, is to tuck a corner of the un-sticky side of the rolling paper behind the backing. Be sure to hold your paper and backing firmly together so that the paper rolls around itself.
Once you have done this, you can now turn the joint and roll it between your fingers until the whole paper is folded into place. Finally, lick the sticky part of the paper and seal the deal!
Step 6: Pack the Joint
The best way to pack a joint is to hold the untwisted paper between your fingers and then to wave the joint through the air several times. Next, take hold of the filter between your fingertips and bang the joint down on a hard surface about three times. Finally, you can use a key or pen to press down on the weed from the top to ensure for the smoothest burn.
You can use nearly anything to pack your joint, a matchstick, a shoelace or even the drawstring from your hoodie. Lastly, you can twist the end of your joint to close it and then tear it off carefully before you light up.

Step 7: Enjoy
Enjoy your hard work. You’ve earned it. If you are with friends, puff puff, pass!
Don’t forget to check out which Budderweeds cannabis products each province is offering through Ontario Cannabis Store (OCS), Alberta Cannabis, BC Cannabis Store or Societe Quebec de Cannabis‘ websites.
Alternative Methods for Joint Rolling
There are as many ways to roll as there are fish in the ocean. You can roll joints in any size you can imagine and even in various shapes! There are a bunch of creative people who have mastered the art of rolling and even make origami-like joints.
There is also a little hack to making a DIY joint, known as the “dollar bill hack”. What you need to do is to take a bill, fold it in half and sprinkle your chopped up weed into it. Next, slip the rolling paper underneath it, roll it up, and lick it sealed.
You might also like to try your hand at the notoriously challenging “cross joint” – which is a joint made in the shape of a cross, where all three tips are lit. You could also try a pinner (which is very skinny joint), a tulip (which literally looks like a tulip) or an L-shaped joint – which are other iconic joint-forms.
If you’re a pro at rolling or if you’ve got a story to tell, share your comments in the forum below and help to spread the love!